

Mice are experts at slipping into homes through tiny gaps and cracks that you might easily overlook. They can squeeze through holes as small as a pencil width, making it tricky to spot their entry points. If you’re hearing scratching noises in the walls, finding droppings, or spotting chewed food packets, it’s a clear sign mice have made their way inside. The first crucial step to getting control of the problem is to carefully identify exactly where they are getting in. Once you know their entry routes, you can target those areas to block access and stop the infestation from growing.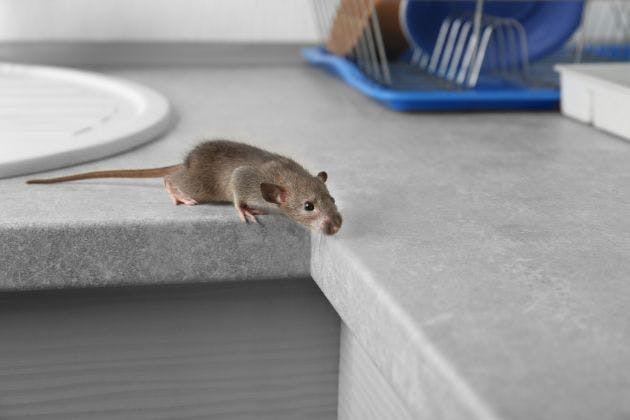
How mice squeeze through such tiny gaps
House mice only need a gap about the width of a pencil to get in. Their skulls are small, and their bodies are flexible, so if their head fits, the rest of them will usually follow.
They also have strong teeth that never stop growing. If a gap is almost big enough, they will simply gnaw at it until it is. That is why small cracks and loose fittings should not be ignored.
Main places mice use to enter a property
Most mouse problems start from a few common routes. Working through these methodically will save a lot of time and guesswork.
Air bricks and vents – particularly older clay bricks or plastic covers with broken slats.
Gaps around pipes and cables – under sinks, behind toilets, boilers, outside taps and TV or broadband cables.
Damaged door seals – especially at the bottom corners of back doors and garage side doors.
Loft soffits and eaves – missing mortar, slipped tiles, or gaps where fascia boards meet brickwork.
Gaps under kitchen units – broken kickboards (plinths) and unsealed holes for pipework.
When you inspect these areas, look for gnaw marks, greasy smear marks, droppings and any fine shredded material that might indicate nesting.
Running a simple evening check
Mice are most active at night, so an evening check can reveal clues that are not obvious in daylight. Pick a time when the house is quiet and most lights are off.
Use a bright torch and move slowly around skirting boards, behind doors and near suspected entry points. Listen for scratching or scurrying and watch for sudden movement along the edges of rooms.
To track activity, lightly sprinkle flour or talc along suspected paths such as under the cooker, along the back of kitchen units and near pipe runs. Check the dust the next morning for tiny footprints or tail marks.
When checking behind appliances, switch off and unplug them first, then gently pull them forward without straining cables or pipes. Do not reach blindly into gaps; use your torch to look first, as there may be sharp edges or exposed fixings.
Room‑by‑room checklist
Kitchen and utility areas
Start where food is stored or prepared, as this is often the centre of mouse activity. Move plinths if they are loose and check the void under units, particularly around sink and washing machine pipes.
Inspect behind the fridge, freezer, cooker and dishwasher for droppings, gnawed packaging and holes in the wall or floor. Look inside cupboards where pipes enter, such as under the sink, and mark any gaps larger than a pencil with tape so you can locate them later.
Living rooms and hallways
In living spaces, mice often travel along skirting boards and behind furniture. Check for droppings in corners, behind sofas and along radiator pipes.
Look at cable entry points for phones, internet and TV, both inside and on the outside wall. Hairline cracks are usually not an issue, but any clear holes or crumbling mortar should be noted.
Bedrooms and loft space
If you hear noises at night from ceilings or walls, you may have mice in the loft or wall cavities. Safely accessing the loft is important; use stable steps and good lighting, and avoid stepping between joists.
Check around the loft hatch edges, water tanks, cable runs and where the roof meets the walls. From outside, stand back and look at the roofline for slipped tiles, gaps at the eaves and damaged soffits or fascia boards.
Garage, shed and outbuildings
Garages and sheds often act as staging points before mice enter the main house. Check the bottom of the side door, especially if there is light visible underneath, and inspect any rubber or brush seal for damage.
Look where the garage meets the house wall for cracks, service pipes or cables. If you store pet food, bird seed or compost, make sure lids are tight and look for signs of gnawing on containers.
Using photos and videos to help your search
Some gaps are awkward to see directly. Using your phone to take photos or short videos can help you inspect behind fixed cupboards, deep under units or along loft eaves.
Take close‑ups of any suspicious gaps, droppings or damage. This makes it easier to compare over time and is useful evidence if you later speak to a professional about proofreading work.
Staying safe around droppings and nesting material
Mouse droppings and nesting sites can carry bacteria that are not safe to breathe in or handle directly. Always wear disposable gloves when cleaning affected areas.
Avoid sweeping or vacuuming dry droppings, as this can create dust. Lightly mist with disinfectant first, then wipe up with disposable cloths and double‑bag the waste. Wash your hands thoroughly afterwards, even if you wore gloves.
Proofing materials that work
Once you have identified likely entry points, choose materials that mice cannot easily chew or pull out. Combining different products often gives the best long‑term result.
Effective options include:
Steel wool with sealant – pack the hole with stainless steel wool, then cap with a quality external sealant to lock it in place.
Metal mesh – fix over air bricks and larger vents, ensuring you keep airflow while blocking access.
Bristle strips – fit to the bottom of doors to close small gaps mice use to slip underneath.
Avoid using expanding foam on its own. Mice can chew through standard foam easily and may even use it as nesting material. If foam is used to fill larger voids, it should be backed up with rodent‑resistant materials such as mesh or steel wool.
Pairing proofing with proper control
Blocking holes without dealing with mice already inside can trap them in your walls or loft. This can lead to odours and further damage if they die in inaccessible areas.
Ideally, you should use traps or a professional control programme alongside proofing work. Once activity has dropped and there are no fresh signs for several days, you can complete more permanent sealing with confidence.
When to call in a professional
If you are still hearing noises after your own checks, cannot reach suspected entry points safely, or are worried about significant contamination, it is time to get expert help. A trained technician can trace routes you might miss and use professional‑grade proofing materials.
Pegasus Pest Solutions can carry out a full survey, advise on effective rodent control and complete robust proofing so mice cannot simply return. To discuss your mouse problem or book a visit, contact Pegasus Pest Solutions on 07501702101, or ask about their rodent proofing and rodent control services for tailored support in protecting your home.